How to factory reset Lenovo laptop
How to factory reset Lenovo laptop: In this article we will discuss in detail about how to factory reset Lenovo laptop let’s start!
How to factory reset Lenovo laptop
Option 1: Proprietary Utility
Many modern Lenovo laptops with pre-installed Windows have a service partition on the hard disk with a backup copy of the operating system and a special utility that allows you to quickly restore the device to its factory configuration.
Stage 1: OneKey Rescue System
Restoring the factory configuration of Lenovo laptops comes down to pressing one function button that launches the proprietary utility “OneKey Rescue System” , which may also be called “OneKey Rescue” .
-
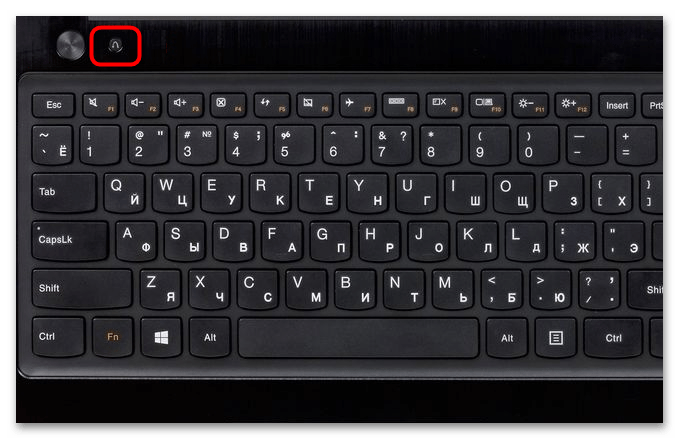
- Turn off your laptop, and then press the Novo Button next to the power button, which has a curved arrow.
-
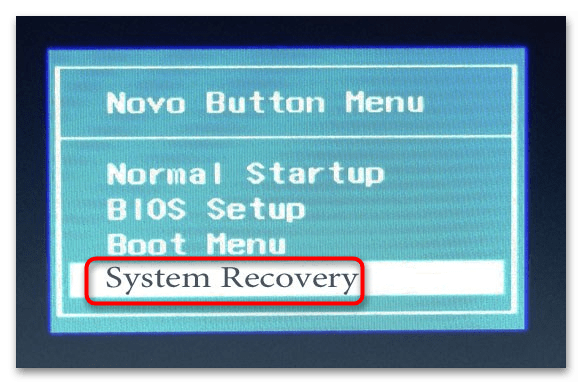
- A dialogue menu “Novo Button Menu” will appear on the screen , use the arrow keys to select the option “System Recovery” in it and press enter.
-
- The built-in utility “OneKey Rescue” will start , select the task “Restore from the original backup” in the step-by-step wizard window and click “Next” .
-
- In the next window of the utility, click “Start” to start the recovery procedure and confirm the action.
The process of restoring the factory configuration will begin, after which you will need to click the “Finish” button.
As a result, all data from the system partitions will be deleted, and files from the service recovery partition will be copied to the cleared space, after which the utility will prompt you to turn off or restart the laptop.
Stage 2: Initial setup
After resetting your Lenovo laptop to factory settings, you will have to go through the initial setup of the operating system. It includes the following steps.
-
- Select your language and region, keyboard layout, and time zone.
-
- Accept the license agreement.
-
- Create a Lenovo ID if necessary (this step is optional).
-
- Give your computer a name and set up basic personalization settings. The last step depends on the version of the factory operating system and may vary slightly.
-
- Connect to the network.
- Click “Use default settings” or “Customize” if you want to change the default configuration.
-
- Create a user account and click Finish .
After completing these steps, the desktop will be loaded in the state in which it was at the time of purchase of the laptop in the store.
Reset Lenovo ThinkPad
Resetting to factory settings in Lenovo ThinkPad laptops is somewhat different from the procedure described above.
- With the laptop turned on, press and hold the F11 key .
- Select a language, click Next , then enter your username and password if required.
- In the menu that appears, select the option “Lenovo Factory Recovery” .
- In the special program window that opens, select the interface language and click “Next” . Accept the agreement and click “Next” again .
- Confirm the deletion of all data during the factory reset process.
After that, the procedure for restoring the factory configuration will begin, after which you will be prompted to reboot the device. Then it remains to perform the initial setup of the operating system: select the country, layout, time zone and other user parameters.
Option 2: Reset Windows
If there is no service partition with a system backup, you can reset the Lenovo laptop using traditional Windows tools. These tools are available in all popular versions of the operating system.
-
- If you are using Windows 10 and the computer boots up normally, launch the Settings app , go to Update & Security → Recovery, and in the Advanced Boot Options section, click the Restart Now button . Next, you will need to choose the reset option: keep personal files or delete personal data and applications.
-
- If you can’t start the Settings app , to enter the recovery environment, restart your computer from the Start menu or from the login screen while holding down the Shift key .
-
- In the menu for choosing actions, select the option “Troubleshooting” → “Reset the computer” and follow the further instructions of the wizard.
If the computer does not boot, use the Windows installation disc to enter the recovery environment.
You can also use the official Refresh Windows Tool or Media Creation Tool from Microsoft to reset (reinstall) Windows.
In the case of Windows 7, you will need to go to the “Control Panel” and select “Backup computer data” → “Restore system settings” → “Advanced recovery methods” and select the option “Reinstall Windows” .
Next, follow the instructions of the wizard. Having an installation disk to complete this procedure is a prerequisite.
